Securing FastAPI Applications with JWT Tokens and OAuth2 using axioms-fastapi
- Abhishek Tiwari
- Guides
- 10.59350/ddvjq-e7c60
- Crossref
- November 30, 2025
Table of Contents
Securing FastAPI applications using OAuth2 doesn’t have to be complex. No matter which OAuth2 authorization server you use - Auth0, AWS Cognito, Okta, Microsoft Entra, or Keycloak - axioms-fastapi provides production-ready security for your FastAPI application. This tutorial covers how to implement authorization in your FastAPI applications using claim-based fine-grained authorization through scopes, roles, and permissions including role-based access control (RBAC), and row-level security (object-level permissions) using JWT Tokens issued by a trusted OAuth2 compliant authorization service.
The Risk of Broken Access Control
According to the OWASP Top 10 for 2025, broken access control is ranked as the number one security risk. In fact, 100% of applications tested were found to have some form of broken access control vulnerability. Common access control vulnerabilities include:
Violation of the principle of least privilege - Access should only be granted for particular capabilities, roles, or users (deny by default), but is often available to anyone.
Missing access controls for API operations - APIs lack proper access controls for POST, PUT, and DELETE operations, allowing unauthorized modifications.
Elevation of privilege - Users can act without being logged in, or regular users can perform admin actions by exploiting missing authorization checks.
Metadata manipulation - Attackers replay or tamper with JSON Web Token (JWT) access control tokens, manipulate cookies or hidden fields to elevate privileges, or abuse JWT invalidation mechanisms.
What is axioms-fastapi?
axioms-fastapi is an OAuth2 based authentication and authorization library specifically designed for FastAPI applications. It validates JWT access tokens issued by authorization servers like AWS Cognito, Auth0, Okta, Microsoft Entra, and others, enabling claim-based fine-grained authorization through scopes, roles, and permissions.
The Resource Server Pattern
Before diving in, here’s where axioms-fastapi fits in the OAuth2 architecture. In a typical OAuth2 setup:
- Authorization Server (e.g., AWS Cognito, Auth0, Okta, Microsoft Entra): Issues and manages JWT tokens
- Client Application (e.g., React SPA, mobile app): Obtains tokens from the authorization server
- Resource Server (your FastAPI application): Validates tokens and protects resources
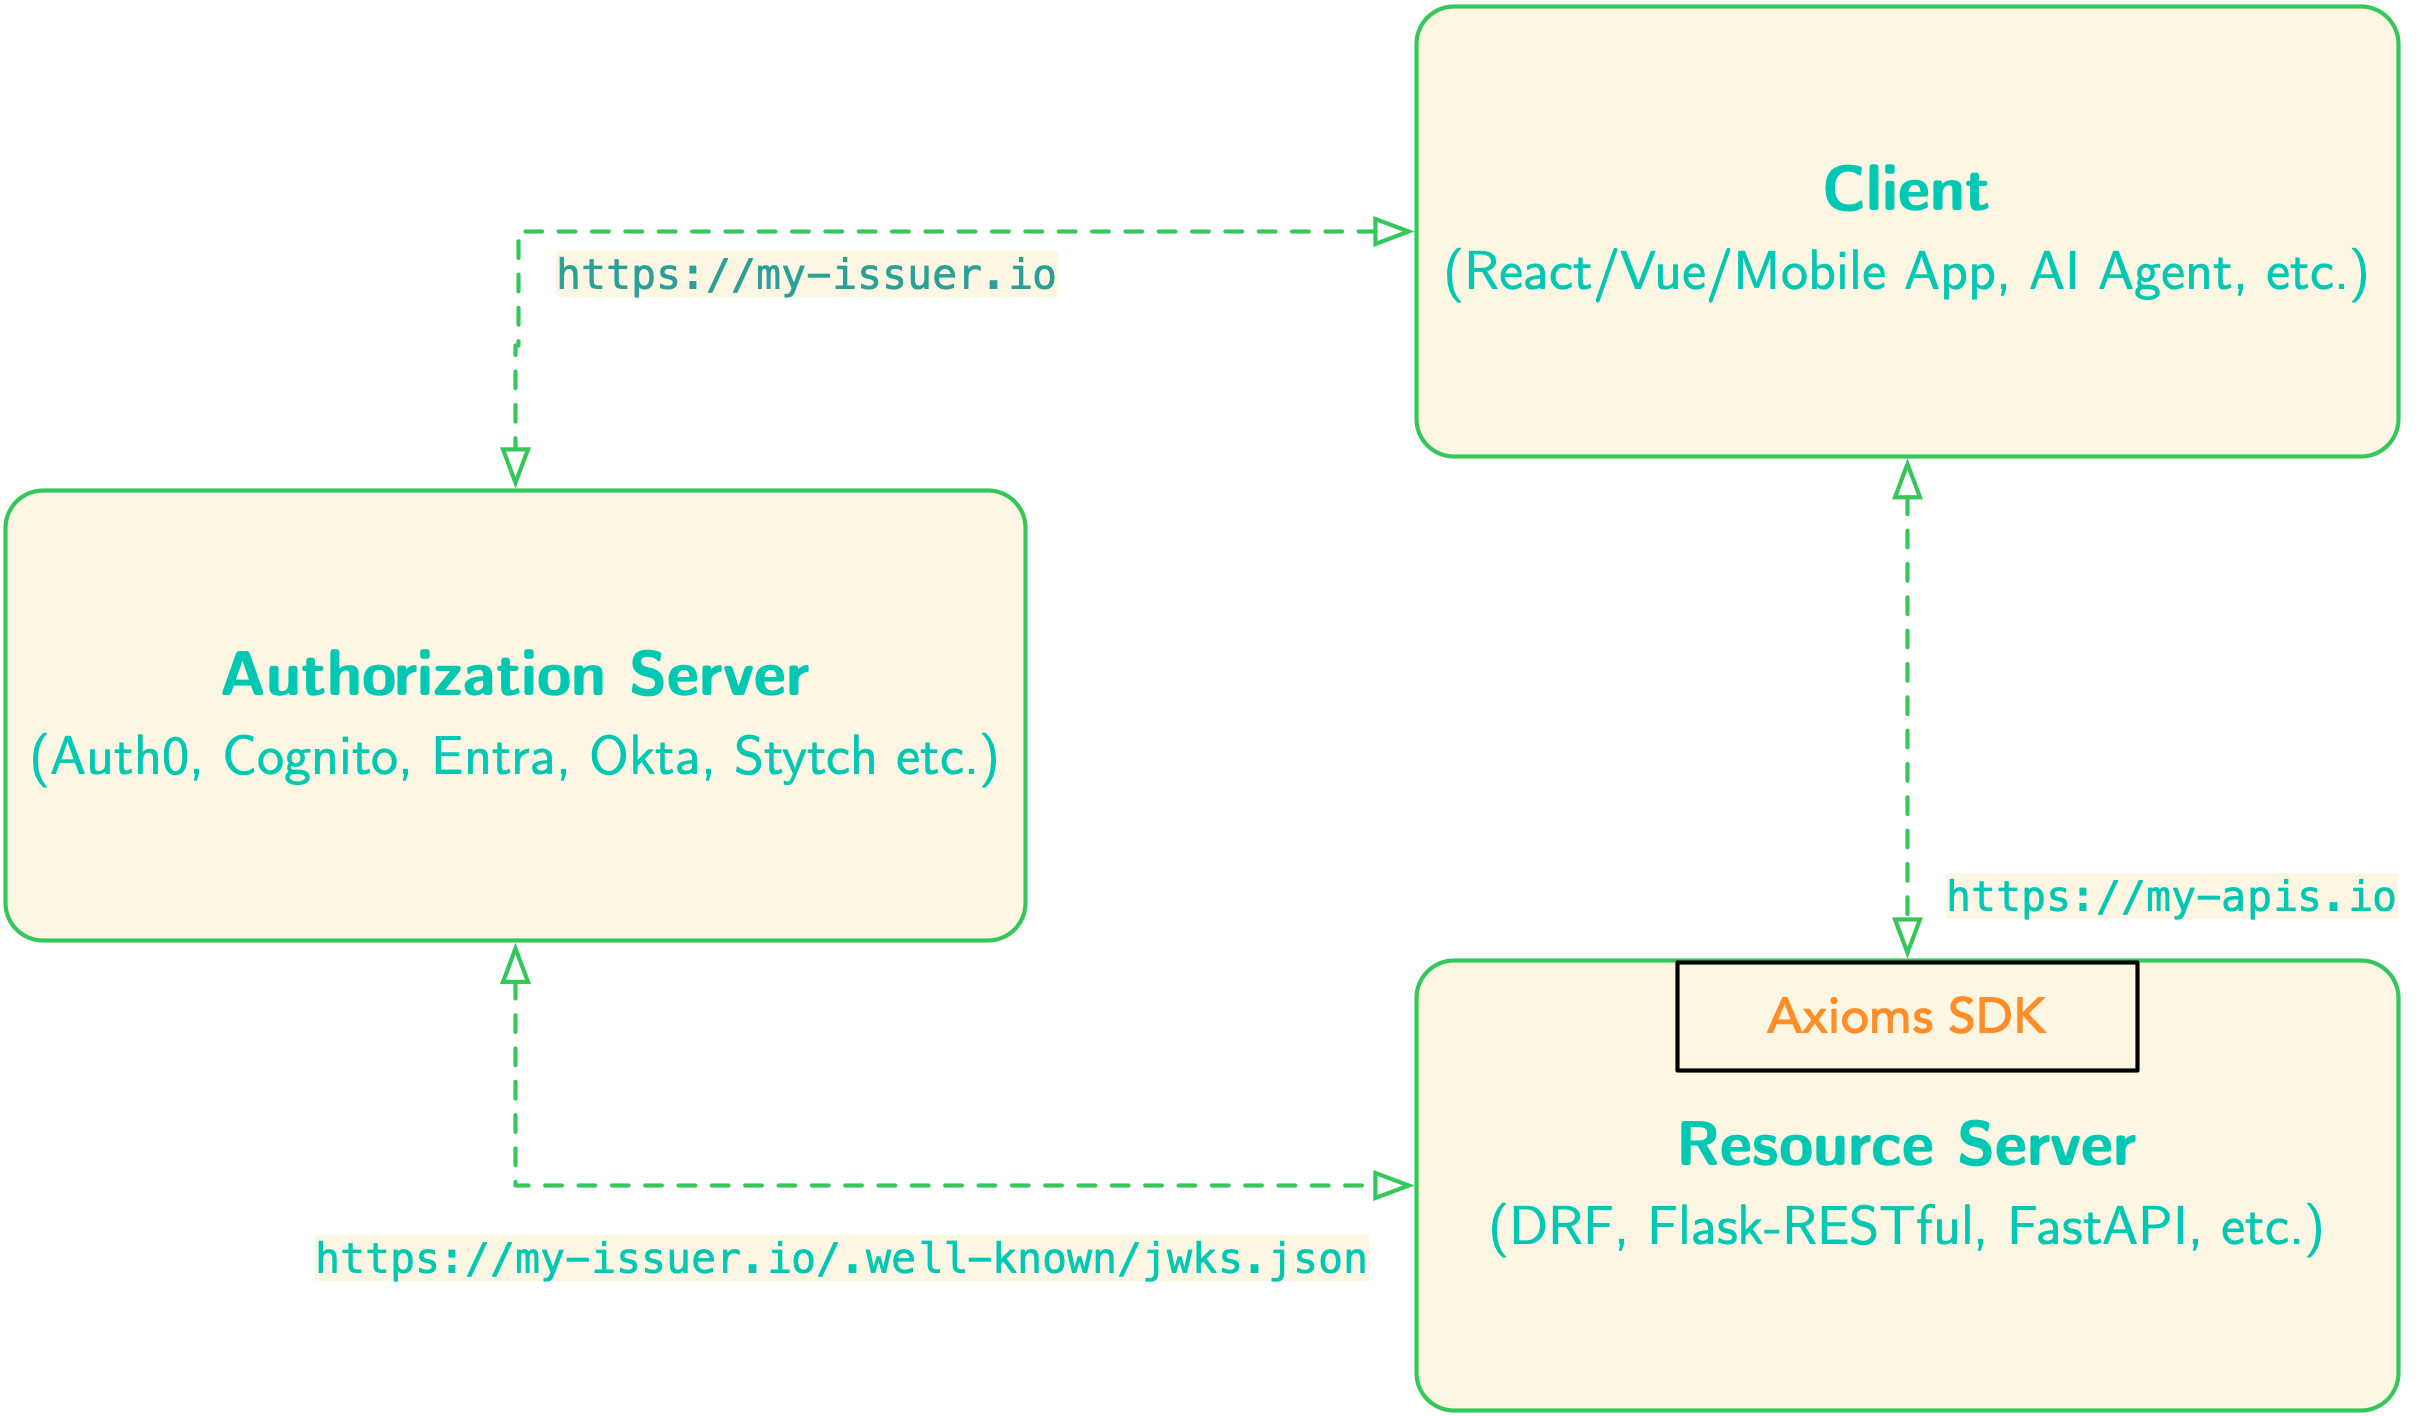
Unlike other FastAPI security plugins, axioms-fastapi focuses exclusively on protecting resource servers. In this pattern, your FastAPI application doesn’t handle user login credentials or issue tokens - it only validates tokens issued by trusted authorization servers and makes authorization decisions based on the claims within those tokens.
This separation of concerns is a security best practice because:
- Your FastAPI application doesn’t handle user passwords or credentials (separation of concerns)
- Token issuance is managed by a trusted authorization service (often cloud-based)
- Your FastAPI application focuses solely on business logic and resource protection (things that really matter most)
Moreover, axioms-fastapi provides enterprise-ready defaults by implementing current JWT and OAuth 2.1 best practices out of the box (see here and here).
Quick Start (5 Minutes)
Get started with FastAPI JWT authentication in just 5 minutes. For a complete working example, see the example application.
- Install
axioms-fastapi:
pip install axioms-fastapi
- Configure your environment (
.envfile):
AXIOMS_AUDIENCE=https://api.example.com
AXIOMS_ISS_URL=https://jwtforge.dev
- Set up your FastAPI application:
from fastapi import FastAPI, Depends
from axioms_fastapi import init_axioms, require_auth, register_axioms_exception_handler
import os


app = FastAPI()


# Initialize axioms-fastapi
init_axioms(
    app,
    AXIOMS_AUDIENCE=os.getenv("AXIOMS_AUDIENCE"),
    AXIOMS_ISS_URL=os.getenv("AXIOMS_ISS_URL")
)


# Register error handler
register_axioms_exception_handler(app)


# Protected endpoint
@app.get("/protected")
async def protected(payload=Depends(require_auth)):
    return {"user_id": payload.sub, "message": "Authenticated!"}
- Run your application:
uvicorn main:app --reload
- Test with a JWT token from JWTForge.dev (requires
jqfor JSON parsing):
# Get token
TOKEN=$(curl -X POST https://jwtforge.dev/token \
  -H "Content-Type: application/json" \
  -d '{"iss":"https://jwtforge.dev","aud":"https://api.example.com","sub":"user123"}' \
  | jq -r '.access_token')


# Call your API
curl http://localhost:8000/protected -H "Authorization: Bearer $TOKEN"
That’s it! Your FastAPI endpoint is now secured with JWT authentication.
Want more? Continue reading for role-based access control, permissions, and row-level security.
Getting Started: Installation
First, install the package using pip:
pip install axioms-fastapi
For the complete example application, you’ll also need:
pip install fastapi uvicorn python-dotenv sqlmodel alembic
Why these dependencies?
fastapi: The web framework (you probably already have this)uvicorn: ASGI server to run your FastAPI applicationpython-dotenv: Load configuration from.envfilessqlmodel: SQL database ORM for object-level permissions demoalembic: Database migrations (used in the example app)
Step 1: Configure Your Environment
For this tutorial, we’ll use JWTForge.dev as our token issuer. JWTForge.dev is a free service that generates valid JWT tokens for testing OAuth2/OIDC integrations - perfect for development and testing (see here).
Why JWTForge.dev for Development?
When building OAuth2-secured APIs, you typically face a chicken-and-egg problem: you need tokens to test your API, but setting up a full authorization server (Auth0, Okta, etc.) takes time and often requires paid accounts. JWTForge.dev solves this by:
- Generating real, cryptographically valid JWT tokens on demand
- Providing a public JWKS endpoint your API can use for validation
- Supporting custom claims (scopes, roles, permissions) for testing authorization
- Requiring no signup - perfect for quick prototyping and testing
- Matching production patterns - tokens work exactly like real authorization servers
Later, when you’re ready for production, you can switch to a real authorization server by simply changing your configuration - no code changes needed!
Environment Configuration
Create a .env file in your project root (see the example/.env.example file):
# Your API audience (the intended recipient of the token)
AXIOMS_AUDIENCE=https://api.example.com


# Issuer URL must match the token's iss claim
AXIOMS_ISS_URL=https://jwtforge.dev


# JWKS URL for fetching public keys
AXIOMS_JWKS_URL=https://jwtforge.dev/.well-known/jwks.json
Configuration Deep Dive:
AXIOMS_AUDIENCE: This is your API’s unique identifier. In production, this might be something likehttps://api.yourcompany.comorurn:myapi. The token’saudclaim must match this value exactly. This prevents tokens issued for other APIs from being used with yours.AXIOMS_ISS_URL: The issuer URL that must match the token’sissclaim. This identifies who issued the token. For JWTForge.dev, this ishttps://jwtforge.dev. In production with Auth0, it might behttps://yourcompany.auth0.com/.AXIOMS_JWKS_URL: The endpoint where public keys are published.axioms-fastapifetches these keys to verify token signatures. Most authorization servers publish this at/.well-known/jwks.json.
Pro Tip: In production, you often only need AXIOMS_ISS_URL - the package will automatically construct the JWKS URL by appending /.well-known/jwks.json. However, for providers with non-standard endpoints, you can explicitly set AXIOMS_JWKS_URL.
Understanding the Security Model
When a request arrives with a JWT token, axioms-fastapi:
- Extracts the token from the
Authorization: Bearer <token>header - Fetches public keys from the JWKS endpoint (cached for performance using JWKS manager)
- Verifies the signature using the public key matching the token’s
kid(key ID) - Validates standard claims:
issmust matchAXIOMS_ISS_URLaudmust matchAXIOMS_AUDIENCEexp(expiration) must be in the future
- Makes the validated payload available to your route handlers
This entire process happens automatically before your route handler executes!
Step 2: Initialize Your FastAPI Application
Now let’s create a FastAPI application with axioms-fastapi configured. We’ll build this step by step.
Import Dependencies
import os
from typing import Optional
from dotenv import load_dotenv
from fastapi import FastAPI, Depends, HTTPException, status
from sqlmodel import Field, Session, SQLModel, create_engine, select
from axioms_fastapi import (
    init_axioms,
    require_auth,
    require_scopes,
    require_roles,
    require_permissions,
    check_object_ownership,
    register_axioms_exception_handler,
)


# Load environment variables from .env file
load_dotenv()
What We’re Importing:
init_axioms: Initializes the package with your OAuth2 configurationrequire_auth: Dependency that validates JWT tokensrequire_scopes,require_roles,require_permissions: Authorization dependenciescheck_object_ownership: Object-level permission checkingregister_axioms_exception_handler: Proper error handling with OAuth2 headers
Create and Configure Your App
Here’s how to initialize your FastAPI application with axioms-fastapi (see example/main.py:95-111):
# Create FastAPI application
app = FastAPI(
    title="Axioms FastAPI Example",
    description="Example application using axioms-fastapi for OAuth2/OIDC authentication",
    version="1.0.0",
)


# Initialize Axioms configuration from environment variables
init_axioms(
    app,
    AXIOMS_AUDIENCE=os.getenv("AXIOMS_AUDIENCE", "https://api.example.com"),
    AXIOMS_ISS_URL=os.getenv("AXIOMS_ISS_URL"),
    AXIOMS_JWKS_URL=os.getenv("AXIOMS_JWKS_URL"),
    AXIOMS_DOMAIN=os.getenv("AXIOMS_DOMAIN"),
)


# Register exception handler for Axioms errors
register_axioms_exception_handler(app)
What’s Happening:
init_axioms()stores configuration in the FastAPI app state. This configuration is used by all authentication dependencies throughout your application.register_axioms_exception_handler()registers a custom exception handler that:- Returns proper HTTP 400/401/403 for invalid requests and authentication/authorization failures
- Includes
WWW-Authenticateheaders per OAuth2 spec - Provides clear error description for debugging
Why Register the Exception Handler?
Without the exception handler, authentication/authorization errors would return generic FastAPI error responses. The OAuth2 spec requires specific response formats with WWW-Authenticate headers that tell clients why authentication failed, what scopes/permissions are required, and which authorization server to use. This makes debugging easier and helps client applications handle errors correctly.
Create Your First Public Endpoint
Before we protect routes, let’s create a public endpoint that doesn’t require authentication:
@app.get("/")
async def root():
    """Public endpoint accessible without authentication."""
    return {
        "message": "Welcome to Axioms FastAPI Example",
        "documentation": "/docs",
        "endpoints": {
            "public": ["/", "/health"],
            "authenticated": ["/protected", "/me"],
            "authorization": ["/api/read", "/admin/users"],
        }
    }


@app.get("/health")
async def health_check():
    """Health check endpoint for monitoring."""
    return {"status": "healthy"}
Public endpoints are useful for use cases such as health checks, documentation and API discovery, public read operations, etc.
Step 3: Basic Authentication - Protecting Your First Route
Now let’s protect an endpoint that requires a valid JWT token. This addresses the violation of least privilege vulnerability by enforcing deny-by-default access control (see example/main.py:148-159):
@app.get("/protected")
async def protected_endpoint(payload=Depends(require_auth)):
    """Protected endpoint requiring valid JWT authentication.


    The payload parameter contains the validated JWT claims.
    """
    return {
        "message": "You are authenticated!",
        "user_id": payload.sub,
        "issuer": getattr(payload, "iss", None),
        "audience": getattr(payload, "aud", None),
    }
How It Works:
payload=Depends(require_auth): This FastAPI dependency tells the framework to executerequire_authbefore calling your handler- Token Validation:
require_authautomatically prevents metadata manipulation attacks by:- Extracting the token from the
Authorizationheader - Validating the signature using JWKS public keys
- Checking issuer, audience, and expiration
- Returning the validated payload or raising an exception
- Extracting the token from the
- Accessing Claims: The
payloadobject is a Box (dict-like object) containing all JWT claims. Usepayload.subfor the subject (user ID),payload.emailfor email, etc.
What Happens on Failure?
If authentication fails, the user gets a clear error response:
// Expired token 401
{
  "error": "invalid_token",
  "error_description": "Token has expired"
}
All failures return HTTP 400/401/403 with proper WWW-Authenticate headers.
Testing with JWTForge.dev
The included Postman collection shows how to generate tokens. Here’s what happens behind the scenes:
// Pre-request script that runs before each API call
pm.sendRequest({
    url: 'https://jwtforge.dev/token',
    method: 'POST',
    header: { 'Content-Type': 'application/json' },
    body: {
        mode: 'raw',
        raw: JSON.stringify({
            iss: 'https://jwtforge.dev',           // Issuer matches our config
            aud: 'https://api.example.com',         // Audience matches our config
            sub: 'user123',                         // User identifier
            exp: Math.floor(Date.now() / 1000) + 3600  // Expires in 1 hour
        })
    }
}, function (err, response) {
    const jsonData = response.json();
    pm.collectionVariables.set('access_token', jsonData.access_token);
});
What You Get: A cryptographically signed JWT token that looks like:
eyJhbGciOiJSUzI1NiIsInR5cCI6IkpXVCIsImtpZCI6IjEifQ.eyJpc3MiOiJodHRwczovL2p3dGZvcmdlLmRldiIsImF1ZCI6Imh0dHBzOi8vYXBpLmV4YW1wbGUuY29tIiwic3ViIjoidXNlcjEyMyIsImV4cCI6MTcwMDAwMDAwMH0.signature_here
This token contains three parts (separated by dots):
- Header: Algorithm and key ID
- Payload: Your claims (iss, aud, sub, etc.)
- Signature: Cryptographic signature proving authenticity
Manual Testing with cURL
You can also test with cURL:
# Get a token from JWTForge.dev
TOKEN=$(curl -X POST https://jwtforge.dev/token \
  -H "Content-Type: application/json" \
  -d '{
    "iss": "https://jwtforge.dev",
    "aud": "https://api.example.com",
    "sub": "user123"
  }' | jq -r '.access_token')


# Use the token to call your API
curl http://localhost:8000/protected \
  -H "Authorization: Bearer $TOKEN"
Understanding the Payload Object
The payload parameter in your route handlers is a Box object containing all JWT claims. Common claims you’ll use:
payload.sub          # Subject (user ID) - always present
payload.email        # User's email (if included by auth server)
payload.name         # User's name (if included)
payload.scope        # OAuth2 scopes (space-separated string)
payload.roles        # Custom claim for roles (array)
payload.permissions  # Custom claim for permissions (array)
payload.iss          # Issuer URL
payload.aud          # Audience
payload.exp          # Expiration timestamp
payload.iat          # Issued at timestamp
Pro Tip: Use getattr(payload, "claim_name", None) for optional claims to avoid errors if they’re not present.
Step 4: Scope-Based Authorization
Authentication answers “Who are you?”, while authorization answers “What can you do?”. Scopes prevent missing access controls for API operations by explicitly defining what actions are permitted. OAuth2 scopes are the most common way to define these permissions.
Understanding OAuth2 Scopes
Scopes represent specific permissions granted to the token holder. Common patterns:
- Resource:Action format:
read:users,write:users,delete:users - Service-based:
email,profile,offline_access - Admin scopes:
admin,superuser
Implementing Scope Protection (OR Logic)
Here’s how to protect an endpoint with scope requirements (see example/main.py:176-188):
@app.get("/api/read")
async def read_data(
    payload=Depends(require_auth),
    _=Depends(require_scopes(["read:data", "admin"]))
):
    """Endpoint requiring 'read:data' OR 'admin' scope.


    The user needs at least ONE of the specified scopes.
    """
    return {
        "message": "Data retrieved successfully",
        "data": ["item1", "item2", "item3"],
        "user_scope": getattr(payload, "scope", None),
    }
Authorization Logic Explained:
- OR Logic by Default:
require_scopes(["read:data", "admin"])means the user needs EITHERread:dataORadminscope - Dependency Chaining: The
_=Depends(...)syntax tells FastAPI to run this check but we don’t need the return value - Multiple Dependencies: You can have both authentication AND authorization in the same route
What Happens:
- Token with
scope: "read:data"- Access granted - Token with
scope: "admin"- Access granted - Token with
scope: "write:data"- 403 Forbidden - Token with no scope claim - 403 Forbidden
Generating Tokens with Scopes
Using JWTForge.dev, you can include scopes in your test tokens:
// Generate token with read:data scope
pm.sendRequest({
    url: 'https://jwtforge.dev/token',
    method: 'POST',
    body: {
        mode: 'raw',
        raw: JSON.stringify({
            iss: 'https://jwtforge.dev',
            aud: 'https://api.example.com',
            sub: 'user123',
            scope: 'read:data profile email'  // Space-separated scopes (OAuth2 standard)
        })
    }
});
Important: OAuth2 scopes are space-separated in the scope claim, not an array. This is different from roles and permissions!
AND Logic with Scopes (Multiple Requirements)
For operations requiring multiple permissions, chain multiple require_scopes calls (see example/main.py:254-266):
@app.get("/api/write")
async def write_data(
    payload=Depends(require_auth),
    _=Depends(require_scopes(["write:data"])),    # Must have write:data
    __=Depends(require_scopes(["openid"]))        # AND must have openid
):
    """Endpoint requiring BOTH 'write:data' AND 'openid' scopes.


    All dependency checks must pass for access to be granted.
    """
    return {
        "message": "Data written successfully",
        "data_id": "data-456",
        "user_scope": getattr(payload, "scope", None),
    }
How AND Logic Works:
- FastAPI executes dependencies in order
- If ANY dependency raises an exception, the request is rejected
- The route handler only executes if ALL dependencies pass
Testing AND Logic:
// This token will work (has both scopes)
scope: 'write:data openid profile'


// This token will fail (missing openid)
scope: 'write:data'
Common Scope Patterns in Production
Microservices Architecture:
# Service A can read from Service B
require_scopes(["serviceB:read"])


# Service A can write to Service B
require_scopes(["serviceB:write"])
User vs Admin Access:
# Regular users can read
require_scopes(["data:read", "admin"])  # Users OR admins


# Only admins can delete
require_scopes(["admin"])  # Admins only
Graduated Permissions:
# Basic access
require_scopes(["basic"])


# Premium features
require_scopes(["premium", "admin"])  # Premium users OR admins


# Admin operations
require_scopes(["admin"])  # Admins only
Step 5: Role-Based Authorization (RBAC)
While scopes define what you can do, roles define who you are. Role-Based Access Control (RBAC) prevents elevation of privilege attacks by ensuring users can only perform actions appropriate to their role.
Understanding Roles vs Scopes
Scopes:
- Fine-grained permissions
- What actions you can perform
- Example:
read:users,write:posts
Roles:
- Coarse-grained groups
- User’s position or job function
- Example:
admin,editor,viewer
When to Use Which:
- Use scopes for API-to-API authorization (microservices, third-party apps)
- Use roles for user-based authorization (admin panels, user management)
- Use both for comprehensive security (roles grant scopes)
Implementing Role-Based Protection
Here’s an example of protecting an admin endpoint with role requirements (see example/main.py:190-205):
@app.get("/admin/users")
async def list_users(
    payload=Depends(require_auth),
    _=Depends(require_roles(["admin", "superuser"]))
):
    """Endpoint requiring 'admin' OR 'superuser' role.


    OR Logic: User needs at least one of the specified roles.
    """
    return {
        "message": "User list retrieved",
        "users": [
            {"id": 1, "name": "User 1", "email": "user1@example.com"},
            {"id": 2, "name": "User 2", "email": "user2@example.com"},
        ],
        "user_roles": getattr(payload, "roles", []),
    }
How Roles Work in JWT:
Unlike scopes (which are a space-separated string), roles are typically an array in the JWT:
{
  "iss": "https://jwtforge.dev",
  "aud": "https://api.example.com",
  "sub": "user123",
  "roles": ["admin", "editor"],        // Array of roles
  "scope": "openid profile email"      // Space-separated scopes
}
Generating Tokens with Roles
// Generate token with admin role
pm.sendRequest({
    url: 'https://jwtforge.dev/token',
    method: 'POST',
    body: {
        mode: 'raw',
        raw: JSON.stringify({
            iss: 'https://jwtforge.dev',
            aud: 'https://api.example.com',
            sub: 'user123',
            roles: ['admin']  // Array, not space-separated string
        })
    }
});
Testing Different Roles:
// Admin user
roles: ['admin']           // Access granted


// Superuser
roles: ['superuser']       // Access granted


// Editor (wrong role)
roles: ['editor']          // 403 Forbidden


// Multiple roles
roles: ['editor', 'admin'] // Access granted (has admin)
AND Logic with Roles (Require Multiple Roles)
For highly sensitive operations, require users to have multiple roles (see example/main.py:269-283):
@app.delete("/admin/users/{user_id}")
async def delete_user(
    user_id: int,
    payload=Depends(require_auth),
    _=Depends(require_roles(["admin"])),         # Must be admin
    __=Depends(require_roles(["superuser"]))     # AND must be superuser
):
    """Endpoint requiring BOTH 'admin' AND 'superuser' roles.


    AND Logic via chaining: All role checks must pass.
    """
    return {
        "message": f"User {user_id} deleted successfully",
        "deleted_by": payload.sub,
        "user_roles": getattr(payload, "roles", []),
    }
Testing AND Logic:
// Has both roles - works
roles: ['admin', 'superuser']  // Success


// Only admin - fails
roles: ['admin']               // 403 Forbidden


// Only superuser - fails
roles: ['superuser']           // 403 Forbidden
Step 6: Permission-Based Authorization (Fine-Grained Control)
Permissions provide the most fine-grained authorization control. While roles define “who you are” and scopes define “what you can access”, permissions define “what specific actions you can perform on which resources”. You can combine all three modes to secure your application.
Understanding the Permission Model
Permissions typically follow the format: resource:action. For example:
users:create- Can create usersusers:read- Can view usersusers:update- Can modify usersusers:delete- Can delete usersposts:publish- Can publish postsreports:export- Can export reports
Generally, a role or scope is a collection of permissions. For example, a user with the admin role may have permissions to perform operations users:create, users:read, users:update, and users:delete.
Token Size Consideration
Due to HTTP header size limits (often around 8KB), a JWT token can become prohibitively large if you include all permissions for the user, so either request and use an access token on a per-endpoint basis or leverage roles and/or scopes to group the permissions.
Implementing Permission-Based Protection
Here’s how to protect an endpoint with fine-grained permissions (see example/main.py:207-220):
@app.post("/api/resource", status_code=201)
async def create_resource(
    payload=Depends(require_auth),
    _=Depends(require_permissions(["resource:create"]))
):
    """Endpoint requiring 'resource:create' permission.


    Only users with explicit create permission can access this.
    """
    return {
        "message": "Resource created successfully",
        "resource_id": "new-resource-123",
        "created_by": payload.sub,
        "user_permissions": getattr(payload, "permissions", []),
    }
Permissions are typically an array in the JWT payload (similar to roles). It is important to note that depending on the authorization server or provider configuration, permissions can also be listed directly in the token scope claim.
{
  "iss": "https://jwtforge.dev",
  "aud": "https://api.example.com",
  "sub": "user123",
  "permissions": [
    "resource:create",
    "resource:read",
    "resource:update"
  ]
}
Generating Tokens with Permissions
// Generate token with resource:create permission
pm.sendRequest({
    url: 'https://jwtforge.dev/token',
    method: 'POST',
    body: {
        mode: 'raw',
        raw: JSON.stringify({
            iss: 'https://jwtforge.dev',
            aud: 'https://api.example.com',
            sub: 'user123',
            permissions: ['resource:create', 'resource:read']
        })
    }
});
Testing Permission Scenarios:
// Has required permission
permissions: ['resource:create', 'resource:read']  // Success


// Has different permission
permissions: ['resource:read']                     // 403 Forbidden


// No permissions claim
{}                                                 // 403 Forbidden
CRUD Pattern with Permissions
A common pattern is to protect each CRUD operation with specific permissions:
# CREATE - requires create permission
@app.post("/api/posts")
async def create_post(
    payload=Depends(require_auth),
    _=Depends(require_permissions(["posts:create"]))
):
    return {"message": "Post created"}


# READ - requires read permission (or admin)
@app.get("/api/posts/{post_id}")
async def read_post(
    post_id: int,
    payload=Depends(require_auth),
    _=Depends(require_permissions(["posts:read", "admin"]))  # OR logic
):
    return {"post_id": post_id, "title": "Sample Post"}


# UPDATE - requires update permission
@app.patch("/api/posts/{post_id}")
async def update_post(
    post_id: int,
    payload=Depends(require_auth),
    _=Depends(require_permissions(["posts:update"]))
):
    return {"message": "Post updated"}


# DELETE - requires delete permission AND admin role
@app.delete("/api/posts/{post_id}")
async def delete_post(
    post_id: int,
    payload=Depends(require_auth),
    _=Depends(require_permissions(["posts:delete"])),
    __=Depends(require_roles(["admin"]))  # Extra safety check
):
    return {"message": "Post deleted"}
Step 7: Object-Level Permissions (Row-Level Security)
One of the most powerful features of axioms-fastapi is object-level ownership verification. This addresses missing access controls for API operations at the resource level, ensuring users can only access resources they own - critical for multi-tenant applications and data privacy. It enforces record ownership rather than allowing users to create, read, update, or delete any record.
The Problem: Table-Level vs Row-Level Security
Table-Level Security (what we’ve done so far):
# Anyone with resource:read permission can read ALL resources
@app.get("/api/resources")
async def list_resources(_=Depends(require_permissions(["resource:read"]))):
    return {"resources": [...]}  # Returns ALL resources
Row-Level Security (what we need):
# Users can only read their OWN resources
@app.get("/api/resources/{id}")
async def get_resource(
    resource=Depends(check_object_ownership(get_resource_by_id))
):
    return {"resource": resource}  # Returns only if user owns it
Database Models with Ownership
First, define models with ownership fields (see example/main.py:36-50):
from typing import Optional
from sqlmodel import Field, SQLModel


class Article(SQLModel, table=True):
    """Article model demonstrating object-level ownership with user field."""
    id: Optional[int] = Field(default=None, primary_key=True)
    title: str = Field(index=True)
    content: str
    user: str = Field(index=True)  # Owner field - matches JWT 'sub' claim
    created_at: datetime = Field(default_factory=datetime.utcnow)
    updated_at: datetime = Field(default_factory=datetime.utcnow)


class Comment(SQLModel, table=True):
    """Comment model demonstrating custom owner field name."""
    id: Optional[int] = Field(default=None, primary_key=True)
    article_id: int = Field(foreign_key="article.id")
    text: str
    created_by: str = Field(index=True)  # Custom owner field name
    created_at: datetime = Field(default_factory=datetime.utcnow)
Design Decisions:
userfield in Article: Stores the JWTsubclaim (user ID) of the ownercreated_byfield in Comment: Different field name to demonstrate flexibility- Indexed ownership fields: Important for query performance
- String type: JWT
subclaims are typically strings (UUIDs, user IDs, etc.)
Creating Resources with Automatic Ownership
Here’s how to create resources with automatic ownership tracking (see example/main.py:329-357):
from sqlmodel import Session
from fastapi import Depends


def get_session():
    """Dependency to get database session."""
    with Session(engine) as session:
        yield session


@app.post("/articles", status_code=201)
async def create_article(
    title: str,
    content: str,
    payload=Depends(require_auth),
    session: Session = Depends(get_session)
):
    """Create a new article - automatically sets current user as owner.


    The user field is set to payload.sub (authenticated user's ID).
    This ensures users can only create articles for themselves.
    """
    article = Article(
        title=title,
        content=content,
        user=payload.sub  # Automatic ownership assignment
    )
    session.add(article)
    session.commit()
    session.refresh(article)


    return {
        "message": "Article created successfully",
        "article": {
            "id": article.id,
            "title": article.title,
            "content": article.content,
            "user": article.user,
        }
    }
What’s Happening:
- User must be authenticated (
payload=Depends(require_auth)) - Article is created with
user=payload.sub - The user’s ID from the JWT is stored as the owner
- No user can create articles for other users
Helper Function for Fetching Resources
Define a helper function to fetch resources (see example/main.py:290-295):
from fastapi import HTTPException


def get_article(article_id: int, session: Session = Depends(get_session)):
    """Get article by ID or raise 404.


    This function doesn't check ownership - it just fetches the article.
    Ownership checking is done by check_object_ownership.
    """
    article = session.get(Article, article_id)
    if not article:
        raise HTTPException(status_code=404, detail="Article not found")
    return article
Why Separate the Fetch from Ownership Check?
- Separation of concerns: fetching is one responsibility, authorization is another
- Reusability: same fetch function can be used in different contexts
- Clarity: ownership checking is explicit via
check_object_ownership
Protecting Read Access
Here’s how to enforce object-level ownership on read operations (see example/main.py:360-378):
@app.get("/articles/{article_id}", status_code=200)
async def read_article(
    article: Article = Depends(check_object_ownership(get_article))
):
    """Read article - only the owner can access their articles.


    check_object_ownership does the following:
    1. Calls get_article to fetch the article
    2. Validates the JWT token
    3. Compares article.user with payload.sub
    4. Returns article if they match, raises 403 if not


    Default settings:
    - owner_field: "user" (Article.user)
    - claim_field: "sub" (JWT sub claim)
    """
    return {
        "id": article.id,
        "title": article.title,
        "content": article.content,
        "user": article.user,
    }
How It Works:
Request with token (sub: "user123")
    ↓
get_article(article_id=5) → Article(id=5, user="user123", ...)
    ↓
check_object_ownership compares:
    Article.user ("user123") == JWT.sub ("user123") ?
    ↓
Yes → Return article to route handler
No → Raise 403 Forbidden
Testing Object Ownership
Scenario 1: Owner Access (Success)
// Create article as user123
POST /articles
Headers: Authorization: Bearer <token with sub="user123">
Body: { title: "My Article", content: "..." }


Response: {
  "article": {
    "id": 1,
    "title": "My Article",
    "user": "user123"
  }
}


// Read article as user123 (owner)
GET /articles/1
Headers: Authorization: Bearer <token with sub="user123">


Response: 200 OK
{
  "id": 1,
  "title": "My Article",
  "user": "user123"
}
Scenario 2: Non-Owner Access (Failure)
// Try to read article as different user
GET /articles/1
Headers: Authorization: Bearer <token with sub="user456">


Response: 403 Forbidden
{
  "error": "insufficient_permission",
  "error_description": "You don't have permission to access this resource"
}
Protecting Update Operations
Here’s how to protect update operations with ownership checks (see example/main.py:380-409):
@app.patch("/articles/{article_id}", status_code=200)
async def update_article(
    article_id: int,
    title: Optional[str] = None,
    content: Optional[str] = None,
    article: Article = Depends(check_object_ownership(get_article)),
    session: Session = Depends(get_session)
):
    """Update article - only the owner can update their articles.


    Demonstrates object-level write protection.
    Users cannot modify articles they don't own.
    """
    if title is not None:
        article.title = title
    if content is not None:
        article.content = content
    article.updated_at = datetime.utcnow()


    session.add(article)
    session.commit()
    session.refresh(article)


    return {
        "message": "Article updated successfully",
        "article": {
            "id": article.id,
            "title": article.title,
            "content": article.content,
            "user": article.user,
        }
    }
Security Benefit: Even if an attacker knows the article ID, they cannot modify it without owning it. The ownership check happens before any database writes.
Protecting Delete Operations
Here’s how to protect delete operations with ownership verification (see example/main.py:412-424):
@app.delete("/articles/{article_id}", status_code=204)
async def delete_article(
    article_id: int,
    article: Article = Depends(check_object_ownership(get_article)),
    session: Session = Depends(get_session)
):
    """Delete article - only the owner can delete their articles.


    Demonstrates object-level delete protection.
    Critical for preventing unauthorized data deletion.
    """
    session.delete(article)
    session.commit()
    return None  # 204 No Content
Custom Owner Fields
Not all models use user as the owner field. Here’s how to handle custom field names (see example/main.py:463-491):
def get_comment(comment_id: int, session: Session = Depends(get_session)):
    """Get comment by ID or raise 404."""
    comment = session.get(Comment, comment_id)
    if not comment:
        raise HTTPException(status_code=404, detail="Comment not found")
    return comment


@app.patch("/comments/{comment_id}", status_code=200)
async def update_comment(
    comment_id: int,
    text: str,
    comment: Comment = Depends(
        check_object_ownership(get_comment, owner_field="created_by")
    ),
    session: Session = Depends(get_session)
):
    """Update comment - only the creator can update it.


    Custom owner_field parameter:
    - owner_field: "created_by" (Comment.created_by field)
    - claim_field: "sub" (JWT sub claim - default)


    Compares: Comment.created_by == JWT.sub
    """
    comment.text = text
    session.add(comment)
    session.commit()
    session.refresh(comment)


    return {
        "message": "Comment updated successfully",
        "comment": {
            "id": comment.id,
            "text": comment.text,
            "created_by": comment.created_by,
        }
    }
Custom Claim Fields (Advanced)
Sometimes you want to match against a different JWT claim (e.g., email instead of sub):
class Project(SQLModel, table=True):
    """Project model using email for ownership."""
    id: Optional[int] = Field(default=None, primary_key=True)
    name: str
    owner_email: str = Field(index=True)  # Matches JWT 'email' claim


def get_project(project_id: int, session: Session = Depends(get_session)):
    project = session.get(Project, project_id)
    if not project:
        raise HTTPException(status_code=404, detail="Project not found")
    return project


@app.get("/projects/{project_id}")
async def read_project(
    project: Project = Depends(
        check_object_ownership(
            get_project,
            owner_field="owner_email",  # Project field to check
            claim_field="email"          # JWT claim to compare
        )
    )
):
    """Read project - only owner (by email) can access.


    Compares: Project.owner_email == JWT.email


    Useful when:
    - Your system uses email as primary identifier
    - Integrating with systems that use email-based auth
    - Supporting multiple authentication methods
    """
    return {
        "id": project.id,
        "name": project.name,
        "owner_email": project.owner_email
    }
JWT Token for Email-Based Ownership:
{
    iss: 'https://jwtforge.dev',
    aud: 'https://api.example.com',
    sub: 'user123',
    email: 'john@example.com'  // This matches owner_email field
}
Step 8: Complex Composite Authorization
Real-world APIs often need multiple authorization checks combined. Let’s explore how to implement complex authorization policies.
Combining Multiple Authorization Types
Here’s an example of layered security with multiple authorization requirements (see example/main.py:222-251):
@app.get("/api/strict")
async def strict_endpoint(
    payload=Depends(require_auth),                              # 1. Must be authenticated
    _=Depends(require_scopes(["openid", "profile"])),          # 2. AND (openid OR profile)
    __=Depends(require_roles(["editor"])),                     # 3. AND editor role
    ___=Depends(require_permissions(["resource:write"]))       # 4. AND write permission
):
    """Endpoint with multiple authorization requirements.


    Access requires ALL of the following:
    - Valid JWT token (authentication)
    - Scope: openid OR profile (authorization level 1)
    - Role: editor (authorization level 2)
    - Permission: resource:write (authorization level 3)


    This creates a defense-in-depth security model.
    """
    return {
        "message": "Access granted to strict endpoint",
        "requirements": {
            "scope": "openid OR profile",
            "role": "editor",
            "permission": "resource:write",
        },
        "user": {
            "sub": payload.sub,
            "scope": getattr(payload, "scope", None),
            "roles": getattr(payload, "roles", []),
            "permissions": getattr(payload, "permissions", []),
        },
    }
Understanding the Execution Flow
FastAPI executes dependencies in order from top to bottom. In the above example:
require_auth: Validates token, extracts payloadrequire_scopes: Checks if payload hasopenidORprofilescoperequire_roles: Checks if payload haseditorrolerequire_permissions: Checks if payload hasresource:writepermission- Route Handler: Only executes if all checks pass
If any check fails, execution stops and an error is returned.
Testing Multi-Requirement Endpoints
Valid Token (all requirements met):
{
    iss: 'https://jwtforge.dev',
    aud: 'https://api.example.com',
    sub: 'user123',
    scope: 'openid profile email',           // Has openid
    roles: ['editor', 'user'],               // Has editor
    permissions: ['resource:write']          // Has write permission
}
// Result: 200 OK
Invalid Token (missing scope):
{
    iss: 'https://jwtforge.dev',
    aud: 'https://api.example.com',
    sub: 'user123',
    scope: 'email',                          // Missing openid/profile
    roles: ['editor'],
    permissions: ['resource:write']
}
// Result: 403 Forbidden - "Insufficient scope"
Invalid Token (wrong role):
{
    iss: 'https://jwtforge.dev',
    aud: 'https://api.example.com',
    sub: 'user123',
    scope: 'openid',
    roles: ['viewer'],                       // Not editor
    permissions: ['resource:write']
}
// Result: 403 Forbidden - "Insufficient role"
Combining Object Ownership with Authorization Layers
Here’s a practical example that combines object-level permissions with multiple authorization layers. Users must own the article AND have the appropriate scope, role, and permission to update it:
@app.patch("/api/articles/{article_id}/publish")
async def publish_article(
    article_id: int,
    # Layer 1: Authentication + Object Ownership
    article: Article = Depends(check_object_ownership(get_article)),
    # Layer 2: Must have publish scope (API-level permission)
    _=Depends(require_scopes(["articles:publish"])),
    # Layer 3: Must be editor or admin (role-based)
    __=Depends(require_roles(["editor", "admin"])),
    # Layer 4: Must have explicit publish permission
    ___=Depends(require_permissions(["articles:publish"])),
    payload=Depends(require_auth),
    session: Session = Depends(get_session)
):
    """Publish an article - requires ownership AND multiple authorization levels.


    Security layers:
    1. User must be authenticated AND own the article (object-level)
    2. App/client must have publish scope (API-level)
    3. User must be an editor or admin (role-based)
    4. User must have explicit publish permission (fine-grained)


    This ensures:
    - Only article owners can publish their own articles
    - Even owners need proper roles and permissions
    - Defense-in-depth security model
    """
    # Additional business logic checks
    if article.status == "published":
        raise HTTPException(status_code=400, detail="Already published")


    article.status = "published"
    article.published_by = payload.sub
    article.published_at = datetime.utcnow()
    session.add(article)
    session.commit()


    return {
        "message": "Article published successfully",
        "article_id": article.id,
        "published_by": payload.sub,
        "owner": article.user
    }
A few observations about the above example:
- Unauthorized access: Non-owners can’t publish articles they don’t own
- Privilege escalation: Regular users without the editor role can’t publish even their own articles
- Missing permissions: Even editors must have explicit publish permission
- Scope violations: The API must have proper scope even if the user has all permissions
Step 9: Running and Testing Your Secured API
Now that we’ve built a fully secured API, let’s explore how to run, test, and debug it.
Starting Your Application
Development Mode,
# With auto-reload for development
uvicorn main:app --reload --host 127.0.0.1 --port 8000


# The --reload flag automatically restarts the server when code changes
# Use 127.0.0.1 (localhost) to restrict access to your machine
Production Mode,
# Multiple worker processes for production
uvicorn main:app --host 0.0.0.0 --port 8000 --workers 4


# Or use Gunicorn with Uvicorn workers
gunicorn main:app --workers 4 --worker-class uvicorn.workers.UvicornWorker --bind 0.0.0.0:8000
Using the Postman Collection
The example includes a Postman collection that demonstrates all authentication patterns. As part of this collection, for every test case a pre-request script automatically generates a fresh JWT token using JWTForge.dev before each API request and includes it in the API call.
// Pre-request script runs BEFORE each request
pm.sendRequest({
    url: pm.collectionVariables.get('jwtforge_url') + '/token',
    method: 'POST',
    header: {
        'Content-Type': 'application/json'
    },
    body: {
        mode: 'raw',
        raw: JSON.stringify({
            iss: pm.collectionVariables.get('issuer'),
            aud: pm.collectionVariables.get('audience'),
            sub: 'user123',
            scope: 'read:data',
            roles: ['admin'],
            permissions: ['resource:create']
        })
    }
}, function (err, response) {
    if (err) {
        console.error('Token generation failed:', err);
    } else {
        const jsonData = response.json();
        // Store token in collection variable
        pm.collectionVariables.set('access_token', jsonData.access_token);
        console.log('Token generated successfully');
    }
});
Custom Claim Names
Different authorization servers use different claim names. axioms-fastapi supports custom claim configuration. For example, AWS Cognito supports a claim cognito:groups, Azure Entra supports scp, and Auth0 uses custom namespaces for the roles claim and also supports the permissions claim.
{
  "cognito:groups": ["admin", "users"],  // Roles in custom claim
  "scope": "openid email"
}
# Configure for Cognito
init_axioms(
    app,
    AXIOMS_AUDIENCE="your-cognito-app-client-id",
    AXIOMS_ISS_URL="https://cognito-idp.us-east-1.amazonaws.com/us-east-1_XXXXXXXXX",
    AXIOMS_ROLES_CLAIMS=["cognito:groups"]
)
Auth0:
{
  "https://example.com/roles": ["admin"],  // Namespaced roles
  "permissions": ["read:users", "write:users"]
}
# Configure for Auth0
init_axioms(
    app,
    AXIOMS_AUDIENCE="your-auth0-api-identifier",
    AXIOMS_ISS_URL="https://yourtenant.auth0.com/",
    AXIOMS_ROLES_CLAIMS=["https://yourapp.com/roles"],
    AXIOMS_PERMISSIONS_CLAIMS=["https://yourapp.com/permissions"]
)
Azure Entra:
{
  "roles": ["Admin", "User"],
  "scp": "user.read user.write"  // 'scp' instead of 'scope'
}
# Configure for Azure Entra
init_axioms(
    app,
    AXIOMS_AUDIENCE="api://your-app-id",
    AXIOMS_ISS_URL="https://login.microsoftonline.com/your-tenant-id/v2.0",
    AXIOMS_SCOPE_CLAIMS=["scp", "scope"]
)
Environment Variable Configuration
If you are using a .env file to load this configuration, see an example below:
# .env file
AXIOMS_SCOPE_CLAIMS=scope,scp
AXIOMS_ROLES_CLAIMS=roles,cognito:groups,https://example.com/roles
AXIOMS_PERMISSIONS_CLAIMS=permissions,https://example.com/permissions
Conclusion
axioms-fastapi provides a production-ready solution for securing FastAPI applications with OAuth2/OIDC. By leveraging established authorization servers and implementing fine-grained authorization patterns, you can build secure APIs. Throughout this tutorial, we’ve seen how axioms-fastapi helps address the broken access control security risk identified by the OWASP Top 10.
References
- A. Tiwari , "JWTForge: A JWT Vending Service for Testing, Fuzzing, and Security Research of OAuth2/OIDC Implementations," Abhishek Tiwari, 2025. doi: 10.59350/6pdmd-3cm41.
- Y. Sheffer , D. Hardt , and M. Jones , "JSON Web Token Best Current Practices," RFC Editor, 2020. doi: 10.17487/RFC8725.
- D. Hardt , A. Parecki , and T. Lodderstedt , "The OAuth 2.1 Authorization Framework," Internet-Draft, Internet Engineering Task Force, 2025. [Online.] Available: https://datatracker.ietf.org/doc/draft-ietf-oauth-v2-1/14/.